
Even Nobel Laureates agree that scientific papers are headed towards jargonocalypse.
<Rant>
I am an engineer by education, and have therefore studied science a lot. Yet I have realised that I find it easier to read something written in Spanish, than most scientific papers written in English (and I’ve never even fucking learned Spanish). Do you know why scientific research papers are so hard to read? I’m going to be unfairly brutal here.
Because the authors of these papers these days, the “global scientific community”, predominantly consists of people whose life depends on one thing: whether they can coat their words with enough bullshit that the real scientists don’t figure out how insignificant their work really is.
I’m not even alone — I know plenty of senior scientists and experienced engineers who share this opinion. Even Andrew Ng, one of the foremost researchers in the field of AI, himself said recently that when he first read the YOLO paper, he found it so hard to read that he had to ask some of his colleagues to help him understand what was going on. (Update 2019: was talking to the Nobel Laureate chemist Roald Hoffman at Cornell recently, and he voiced the same concerns. Go figure!)
Now wait — to those who are offended by this claim, please allow me to expand before you write a nasty comment. You are very likely an ass-witted graduate student who thinks that writing fat tongue twisters in your paper will make you seem smart enough to hide whatever mistake it was that got you selected for your current position in the first place. (Now you can write that comment)
Now, I do understand that you can’t write papers simply using high-schooler vocabulary. I also acknowledge the need for the required pre-requisite knowledge while reading a scientific paper. There is indeed always a need for some technical jargon, because in general the target audience of these papers are also experts in their niche fields. I’m not advocating that scientists simply replace every single “difficult sounding word”. This is about the other practice of adding additional fluff to make even simple things sound more sophisticated on paper. I would argue that a marginal increase in readability would increase a paper’s readership by at least 5 times. So improving readability by a factor of 2x is more than enough and that’s all I ask for — not suggesting that you turn every paper into a textbook.
Read Albert Einstein’s paper if you think it can’t be done. And here’s another very influential paper written in simple language.
I don’t blame you for following the herd — your entire system forces you to do that, and I have been in the same situation — my own supervisor in college once told me that my project reports should use more sophisticated English and passive voice and what not, so that it “sounds like real research”. That whenever I have to choose between two words, I should use the more fancy term so that people take my work seriously.
Guess what, this culture of trying to describe everything in a more sophisticated way is what is in part responsible for destroying the world. Because of this tough lingo, students get put off from pursuing science and it also puts a language barrier to scientists from other countries. By crypting your knowledge you are basically hoarding it from the common people who might have taken an interest in science or research in general, which makes the whole society dumber as a result. And then you will get on your own faux Neil Tyson chair and complain about people who don’t understand science, deny climate change and do stupid things. Well guess what, if you tried to make science accessible to people, maybe they would actually take interest. (For the record, I greatly respect Dr Tyson and his efforts to educate common people about science. I’m angry at the many “scientists” who echo his sentiments while also hypocritically bloating their papers with unnecessary jargon.)
Allowing blind people to use elevators is one thing; but you can show real empathy and humanity by adding Braille to the elevator buttons.
Documentation for programmers has reached the same unprecedented level of hyper-jargon bullshit. Sometimes I am amazed that a document which is supposed to provide clear and EASY instructions can be harder to understand for a beginner than a hieroglyphic mural in the pyramid of Giza.
A great challenge in reducing income inequality and saving the world is to level the playing field and educate the damn masses. This is why I’m on a quest to democratise specialized knowledge in my own way.
</Rant>
My previous article, a dummies’ guide to Google App Engine, shocked me by attracting a non-zero audience of people who shared the same sentiment as I do.
So today I will clean out one of the largest piles of cow-shit that new developers have to deal with. Learning how to store projects on GitHub.
I have to point out that this is more of a “git” tutorial; git and GitHub are technically two different things. Moreover, git can be used for waaayy many more things than just storing your projects online. It is a ‘version control system’, and you can Google what that means. If you want to learn the more advanced stuff, take this online course.
I looked at some other git tutorials online which are supposedly for beginners. But after reading this and even THIS article, I have reached the conclusion that my intelligence is sub-human, and therefore only a tutorial meant for chimpanzees and dumber would work for me.
Assuming that there are other people on the planet who fall into the same category, I am writing a GitHub tutorial for chimpanzees.
By the way, the best GitHub tutorial I’ve found so far is this:
Don’t get me wrong here— I like GitHub. But I find it hard to read the fancy documentation written by people who have forgotten the boundary between English and Java.
Sorry— I digressed again. No more rants.
I’ll jump right into it. By the way, PLEASE let me know if you encounter any problem following this tutorial.
ZERO-BULLSHIT GITHUB GUIDE
1. What is a repository? I keep seeing this word in every git tutorial.
A repository is a fancy word to describe what is basically an online folder which stores all the code files of a particular project. So for example if you’re building an app called “Monkey species identifier”, you’ll have one big folder which has all the sub-folders and files related to that app project right? That is called a “repository” and it will have a name like “Monkey-species-identifier”. For the record, I swear this name wasn’t inspired by the title of this tutorial.
The only thing that makes a ‘repository’ different from a regular folder is that it has a few hidden files which give it certain special properties. These properties allow the git system to track changes in this folder, know where it comes from, etc. With that you can even reverse and repeat changes made to the folder, and do other cool tricks, all of which fall into the big bag of “version control”.
2. Download or install Git
There are two ways you can do this. If you’re using a Mac (like I do), don’t bother surfing around the web looking for things to download. Just open your Terminal, and type “git”. The Terminal will itself tell you that you don’t have git installed, whether you’d like to install it, yada yada yada and basically take you through the process on its own. And by the end you’ll suddenly have git on your system!
If you use Windows, you’ll have to download git and then you might need something called a Powershell, which looks just like the command prompt but maybe has a different color.
If you use Linux, I’m not sure what you should do, because you’re probably a geek who knows this stuff already? Why else do you even have Linux?
Anyway, the official documentation for this step can be found here: https://help.github.com/articles/set-up-git/
Scroll down the mumbo-jumbo words like “forking” and “repository” etc, and go straight to the good shit, where they use familiar words like “download” and “install”.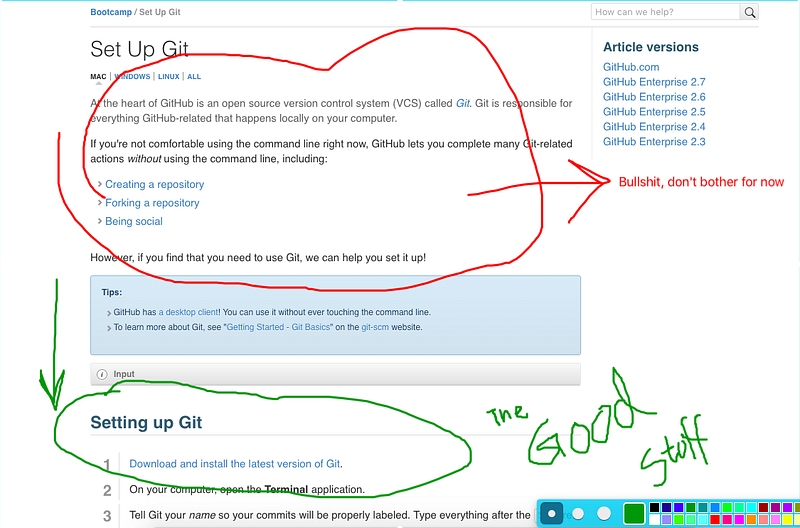
3. Once you have git, open your Terminal and do this to check if it works fine:
After this, it doesn’t matter if you have Windows/Linux/Mac etc. It’s all the same once you have installed GitHub.
FIRST — Learn how to use the command line to navigate between folders.
It’s actually quite simple! I don’t have time to create my own tutorial, so I’ll just refer you to this beautiful 3-minute video which explains how to use the command line very easily, in a way that a chimpanzee could understand. It’s not my own video, I found it online and it’s excellent.
Click on the image link.
Now, how to use GitHub?
You basically need to remember only FOUR commands to get up and running: clone, add, commit and push.
Creating a new project
- Go to github.com and sign-in.
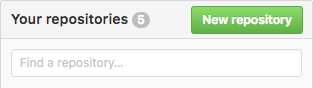
- Find and click on the ‘New Repository’ button. You will see something like this in the right-hand side of your window, somewhere.
3. You will see something like this:
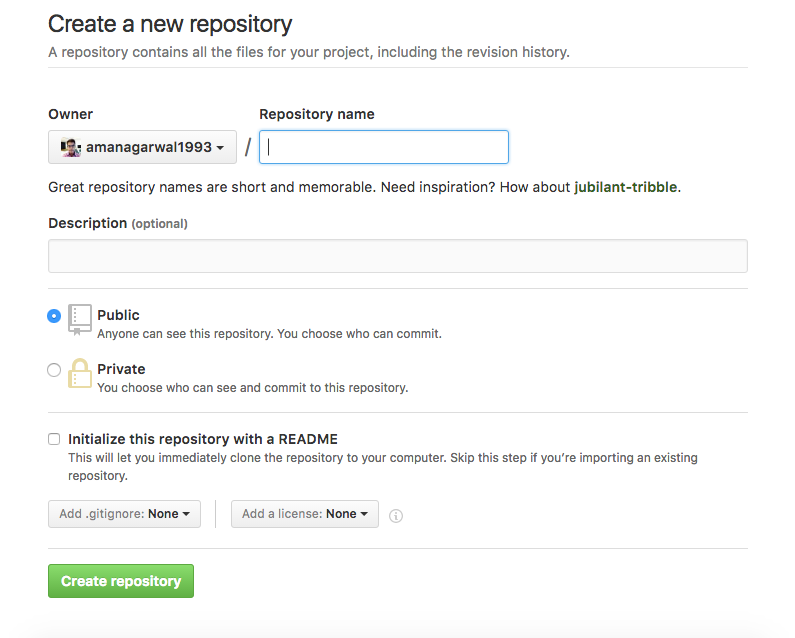
4. Create a repository name. There should be no spaces or punctuation in the name. For example, “My-Awesome-App”.
5. Choose the ‘Public’ option for now. To choose ‘Private’, you’ll need to upgrade your account to a paid account. It doesn’t really make a difference unless you’re working in a company and/or your code is meant to be kept secret from the world.
6. Check ‘Initialize this repository with a README’.
7. Click on ‘Create Repository’.
You have created a new repository called ‘My-Awesome-App’.
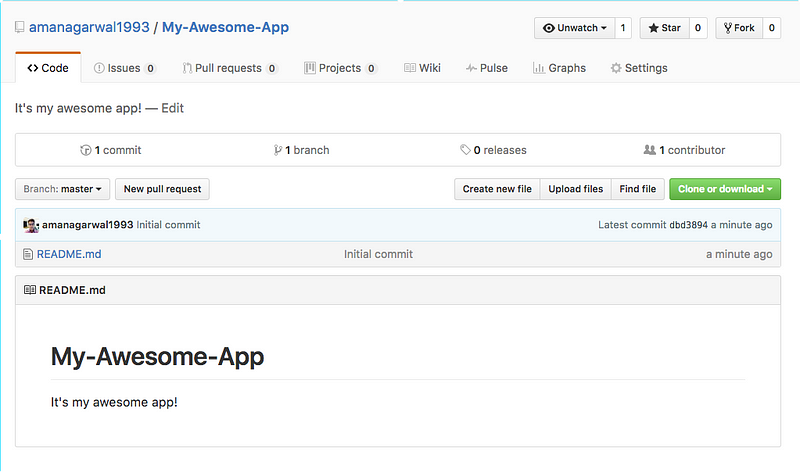
8. Now you’ll see this:
Currently your new Repository has only one file, which is the README.md. It was created because you chose the option to initialize the repo with a readme. :)
9. Then, go to your GitHub repo, and click on “Clone or download”. Copy the https url.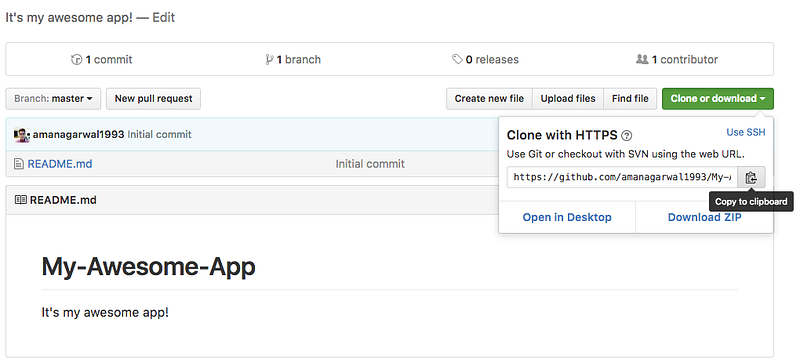
11. Now open your terminal/powershell/whatever. Navigate (using cd and ls functions) to the place where you want to set up your project folder.
12. Type “git clone” and then paste the url you copied in step #10. Press enter, as shown below:
13. You will see the folder My-Awesome-App being created. Now, add the project files (your code files) to this folder.
Bingo! You have now created what is called a “local repository”, which is a clone of your repository on github.com.
Now — how to store your code online and make changes to it
The next step is to sync these changes with your online repository on github.com. This requires 2 steps:
- Tracking changes in the local repository
- Updating the online repository to reflect those changes
For the first step, tracking changes locally, we use 2 commands, add and commit. You don’t have to understand how exactly they work (for now). Basically it’s just the way the git system is created, so we shall roll with that.
1. If your terminal is not already inside your My-Awesome-App folder, use cd to get inside it through the command line.
2. Do this:
git add *
This tells GitHub that you have added some new files to your project, that you want to make a part of the project. You will use the add command every time you add a new file to that folder.
17. Now, we will ‘commit’ those changes. Type the following command: git commit -m “short comment”. For example,
git commit -m “Added new files”
18. Almost there! Now your local repository is up to date with the latest changes. Time to sync it with the online repository.
19. Type: git push origin master
20. By executing the above command, your terminal will upload the local files to the online repo, and now your code is stored on github!
If you go to github.com now and check your repository, you will see all your code files there. It wasn’t too difficult, right? :)
“What do I do next time?”
The above tutorial was all about your first time using GitHub. But what if you make changes to that project and want to sync your updates again? Well, here’s what you do:
- Make whatever changes to your code on your computer in the local repository, and save.
- Command: git add *
- Use command git commit -m “comment”. This allows you to document the change you just made to the code. You know, like telling someone “hey I added a new feature”. (If you want to record different changes to 3 different files, you will use the command thrice, by using a different comment for each file and adding FILENAME at the end, like ‘git commit -m “comment” FILENAME’
This way, you will be able to document the latest changes for each file of code.) - Sync the changes with git push origin master.
Makes sense? Now go ahead and try it out.
Do let me know what you think of the tutorial. Even if it’s bad. I post all my essays on Reddit for the community to rip apart, so don’t worry I have thick skin. :)